BST-1R 1: Adjusting
Last Updated on March 31, 2021
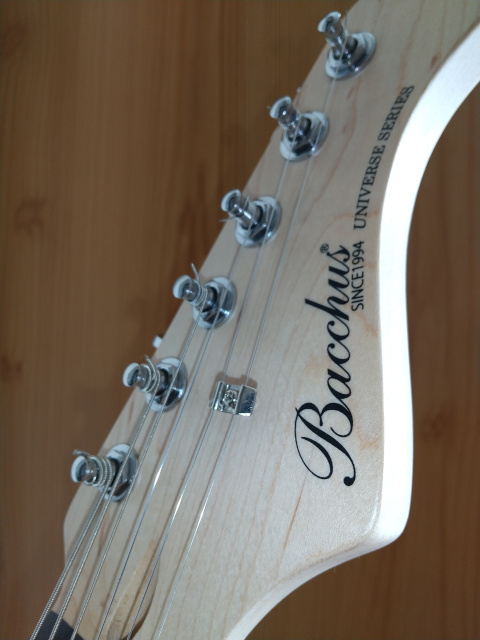
"ST" style guitars is the models which have the similar shape and units to Fender Stratocaster. The names, "STRATOCASTAR", "STRAT", and the shape of the headstock are properties of Fender Musical Instruments Corporation. However, the ST style with three single-coil pickups and the tremolo unit is popular in the world-wide range since 1950s, and many manufactures are making guitars with ST style. Outside of the U.S., Stratocaster is imported, and expensive for young people who mainly enjoy the guitar music. In several candidates, such as Squire and Ibanez, I decided to buy Bucchus BST-1R. Note that Bucchus is the brand name of Deviser Corporation in Nagano. In view of sound, I thought all of guitars in this island, including Epiphone Les Paul with humbuckers, have brighter sound than guitars in the U.S. The sound of "fat" Stratocaster is only made in California or Mexico. I expected that BST-1R have bright sound as others, but the BST-1R shipped to me has fortunately (or unfortunately) fat sound. Even now on the IT technology, ST style guitars are played in many tunes online. Basically, the sound is bright with its unique spring reverb. The fingerboard of BST-1R is a rosewood with 22 frets and the radius is flatter than the vintage style with solid maple, and this choice means the modern ST style. I thought the modern ST style has brighter sound than the vintage style even though the fingerborad is a rosewood. However, my shallow mind is just betrayed.
I recommend that you spread out a rubber mat on your working table. The mat prevents from scratching your guitar. Besides, the mat may prevent from sliding your guitar, but this effect depends on the type of the mat. The hard rubber mat doesn't help your guitar against sliding. It's critical to drop down your guitar from your table. You should be aware of the guitar position on your table through working, even if you have any grip for your guitar.
Identified sizes of screws are only applied for my guitar. There are a lot of sizes for screws on the same unit among ST style guitars. Not surprisingly, even if your guitar is BST-1R, make sure that you measure actual screws and determine these sizes. Sizes of screws may be changed in the factory. Incorrect screws cause to break threaded holes.

Poplar in the data sheet.

I superglued around holes and sanded over painter's tape. Note that it's 100% pure cyanoacrylate.
First of all, I detached the neck from the body. Without detaching the 22-fret neck, you can't access the inside of the front cavity under the pickguard. The neck is fastened by M4.5 or M4.8 45mm oval head wood screw (I haven't checked the thread pitch yet). I widened the holes on the body for the neck to diameter 6mm by 12mm taper reamer, and 4mm rounded file for easy detachment and attachment of the neck. Besides, by widen holes that screws can't bite in the body, screws work for fastening between the neck and the body, and this work is known for obtaining long sustain. Note that the taper reamer doesn't widen the inside of the holes. I applied the taper reamer from both sides to get 6mm outsides of holes, and I applied the rounded file to widen insides of holes to fit with outsides (I finished this work until the screw can go through the hole smoothly).

After detaching the neck, I flipped the body, and opened the back spring cavity.
I cleaned cavities in the body using a vacuum, wet paper towels, and cotton swabs which are especially for corners. Note that paper towels are convenient to clean, but just create garbage. Furthermore, screws can be mixed with paper towels in your garbage box. In this work, you should set a special "recycle box" to search afterwards. The powder is the remain after grinding the urethane coating. When I disassembled all parts of the tremolo unit, I started from removing screws of the spring hanger. Flipping the body causes scratching. You should reassemble in the reversal way not to flip many times. Don't flip the body with loosen screws of the spring hanger. Otherwise, these screws damage holes on the wall of the back cavity by the weight of the body. On remounting screws, you must use existing threads in holes. Not to break the existing threads, you remount a screw with a little force to fit the thread of the screw with the exiting thread naturally. If you feel that it's hard to loosen screws of the spring hanger, you change the screwdriver to the one fitted with the screw drive, and you make the holding power along with the straight line from the handle of the screwdriver to the tip of the screw. Note that springs which aren't stretched can be removed by your hand after loosing screws of the spring hanger. I just picked up the center of a spring to remove. However, springs may accidentally damage your hand, and put on work gloves. BE SURE THAT YOU USE A HANDY SCREWDRIVER. DON'T USE A ELECTRIC SCREWDRIVER, AND IT DAMAGES EXISTING HOLES. At first on contacting a screw and a hole, I used my hand to fit the thread of the screw with the thread of the hole. On setting springs, you need to check the hooks of springs on the side of the tremolo block are correctly inserted. I experienced several hooks became floated on the work of stretching.
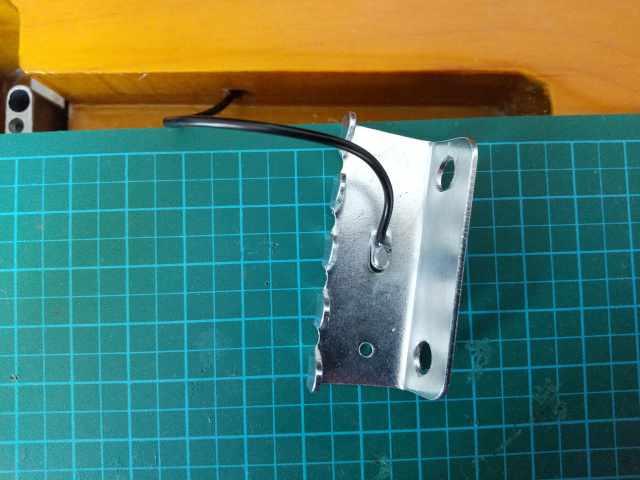
Considering the heat conduction, I unsoldered and soldered the ground wire to the spring hanger on the cutting mat. Ordinal cutting mats aren't heat-resistant, and a thicker wood board is preferred than a cutting mat.
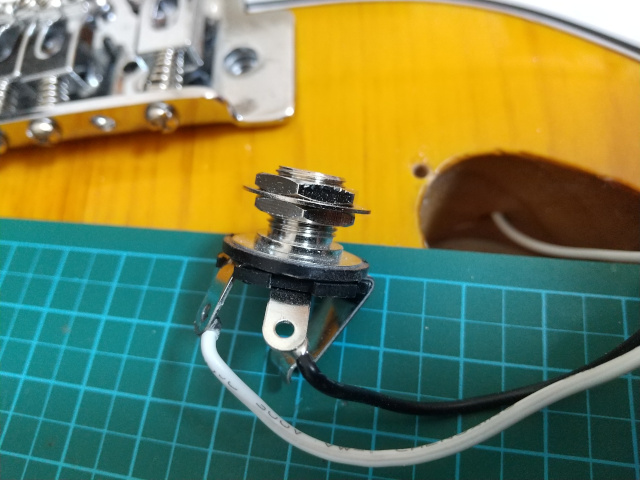
The back cavity became clean, and I turned the body to be appeared on the front side. On this picture, I have already removed the boatlike jack plate.
I removed the boatlike jack plate from the jack. Note that loosening the back nut (the lower nut on the picture as above) is the best way to remove the jack from the plate. The plate is fastened between the front and the back nut (the washer is usually under the front nut). The back nut is also used to adjust the forward length of the threading part sticking out on the jack. Make sure that you rise the back nut in the thread on placing the jack plate, otherwise you can't loosen the back nut on removing the jack plate. In this time, I don't unwired the jack, but I can flipped the pickguard on the body. However, placing the flipped pickguard on the body causes to scratch. Cover the body by a rag under the pickguard. Anyway, be aware of the moving pickguard which damages the coating of the body. I recommend that you cut the wire of the jack to work for the pickguard on the table, but not on the body. However, I suggest a new jack to be wired on reassembling.

I fixed the coating peeled off on the edge of the cavity for the neck pickup by a superglue.
I sanded the edge of front and back cavities by a #60 sand paper. Several edges were pointed by urethane coating. Your cloth may be hooked by the point.

Hmm. Like a 3D texture? I feel deja vu about this working. Besides, the wood is just poplar? Patterns of poplar woods used to be olive-colored. I guess it may be alder, because the weight is 3.7-3.9, the light heavy class. The sheet of the alder pattern (three-tone sunburst) on the alder wood. It may be the evidence that ST style is the child of mass production.
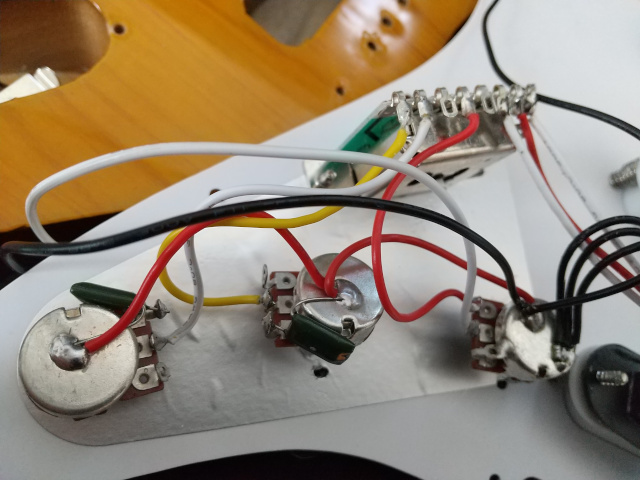
Wiring is good.
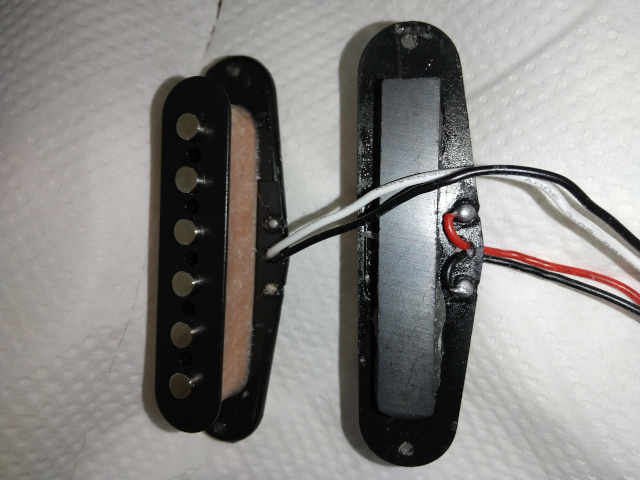
Ceramic Pickups (the neck and the middle on the picture as above). I've not measured these DC resistances, but I guess moderate power. I found out that pitches of pole pieces are different among neck, middle, and bridge pickups. It's not like pickups of Les Paul SL. The reason of the difference is the widening margins between strings from the nut to the bridge. Cases of pickups of ST style doesn't seem to be shareable with pickups on other positions. The phase of these pickups is seem to be the same as pickups of Les Paul SL. The magnetic pole of the middle pickup is reversed comparing to the neck and the bridge, and this difference helps to reduce hum noise on half positions. This effect is significant in the high-gained sound.
Cleaned the nut. I coated graphite by a pencil for the smoothness in slots of the nut. I think B2 or other soft graphite pencils are preferred.
I customized around the tremolo unit. I replaced screws of the bridge unit and the spring hanger.
Two screws are set in the manner considering the movable bridge. You shouldn't loosen these screws too much, but shouldn't fasten these. You can test the smoothness of the movable bridge, but be sure that the bridge doesn't accidentally hurt the body.
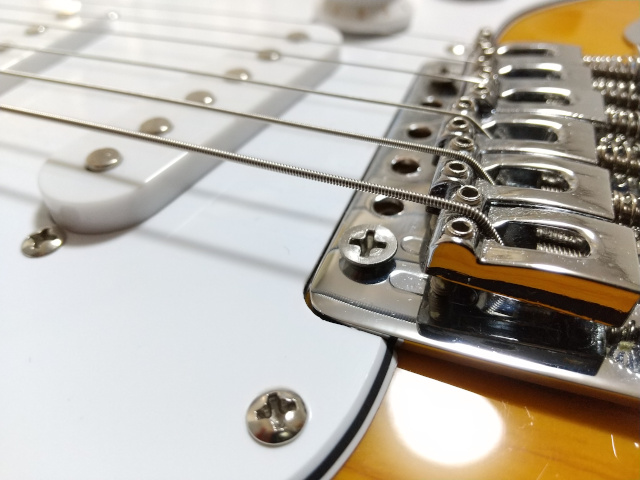
The bridge was "fastened" by 6 screws. However, this bridge will move. To get smoothness of moving upward and downward, I only applied 2 screws on two sides and remained other four holes. Besides, I replaced factory M3.8 25mm pot head wood screws with Yahata stainless M3.8 25mm dish head screws (JIS B 1112:1995). I identified the screw's size by checking thread pitches of screws. Dish heads also help the smoothness of moving because the shape of the heads is conical. This work helps to stabilize tuning of strings. I think that unstabilized tuning is come from a lumbering tremolo unit. You wonder its weakness of the bridge with only two screws. After tuning, the strings are pulled by approx. 50Kg, and the screws of the spring hanger and the bridge unit endure the force. I assume that the iron bridge chops axes of two screws with 100Kg force at maximum because the system of ST style guitars is just the same as a pully which endures the doubling force from both sides. The JIS standard says the screw could endure at least 100Kg force. The issue of the twin is how the wood can endure the force from screws. We can consider pushing force from the bridge to the body directly, and it would reduce the force to screws. Anyway, a basic tremolo unit should be used with 1% of your big arm power because this unit is on the woody body. I think that arming for a +- half tone seems to be good. I think that setting a tremolo bridge using 6 screws needs your tough work to get the precision for smoothness. You can draw 6 circles inline by hand, but the number of circles relates to the correctness of the straightness. 2 circles guarantee the straightness because of no other circles on the half way. In several cases, I would say only two screws in 6 screws support the bridge because of the lack of the straightness.

The bridge floating with approx. 3mm height. I measured this height at the side of the 6th string because the edge at the side of the strap pin is rounded. Floating gives not only arming a little + tone, but also spring reverb. I applied 10-46 Regular Slinky. Regular Slinky is one reason of the fat sound. On casing, I drop down tuning of strings to -50 cents, and the floating declines to about 1mm height.
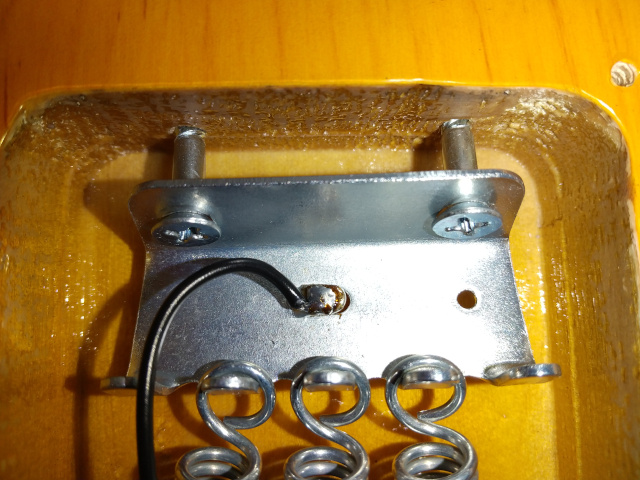
In the spring hanger, I replaced factory M3.8 35mm (actually measured) pot heads for woods with Yahata Unichrome M3.8 38mm dish heads (JIS B 1112:1995). Actual lengths of the two seem to be same. The length of the dish head screw includes its corny dish, but the length of the pot head screw doesn't include its pot. The margin between the wall of the back cavity and the spring hanger is 7mm with tuned Regular Slinky. I hope no piercing between the front and back cavities, but I haven't checked yet. I recommend that you loosen the screws of the spring hanger to the 10mm distance when you start to replace strings, and gradually fasten these with tuning. On replacing factory strings with the set of Regular Slinky, several ball-ends are stuck in holes, I used a woody tooth pick which is cut its tip to push stuck balls. I recommend that you don't use a 5-56 lubricant for this work. If you use the lubricant, you need to clean with disassembling all parts of the tremolo unit and the body. The lubricant is basically not for coatings. The urethane coating on my guitar seems to be safe, but the lubricant may damage lacquer coatings, etc.
* In JIS screws, the button or dome head is called as the "nabe (pot)" head, and the flat head is called as the "sara (dish)" head.
Let's demonstrate. I edited tunes in Audacity on Ubuntu 20.04 LTS. I just plugged BST-1R to an amp, IBZ10, and the PHONE to an ADC, UCA222. I recorded the sound around -12bB at the mid point, and the noise floor is around -50dB on touching strings for grounding in term of alternative current. Bass of IBZ10 is dialed to 0 over all recordings because of the fatness. Recent ST styles are expected to be trebly. However, the full treble causes the high frequency noise coming from resonance on electric circuits in BST-1R and the amp.
It's Blues. Normalize to -0.5dB (Cut DC Bias) > Noise Reduction > Mixed Rhythm and Solo to Stereo.
E Blues Take 1 - "No Second Chance"
It's Folk. Noise Reduction > Normalize to -0.5dB (Cut DC Bias) > Compressor > Normalize Again > Phaser > Fade In and Out. The 120BPM is difficult to keep its tempo, and I turned off the monitor and only listened clicks. Note that the reverse effect to this tune may keep you awake.
Purchasing Grapes
This is the link to the video clip on my YouTube Channel with its world-wide CDN. 210MB for Dancing flowers. I used OpenShot on Ubuntu 20.04 LTS.
On recording, high frequency noise is picked on C chord, I needed to adjust Tone knobs to 5, and Treble of the amp, IBZ10, to 3.
Settings on Audacity.

Noise Reduction on Both Tunes: First, get the noise profile by selecting the area before or after playing in the track. I select about 2 seconds that I touched strings, but not played. Make sure that you check the sound of the area has only noise using your monitor and the analyzed spectrum.
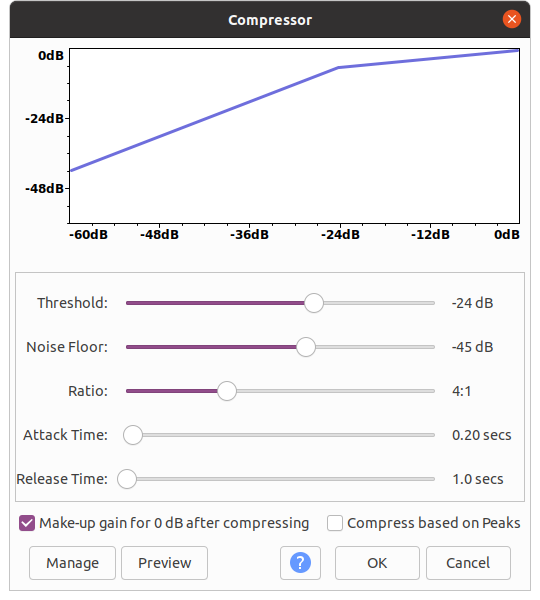
Compressor on "Purchasing Grapes"
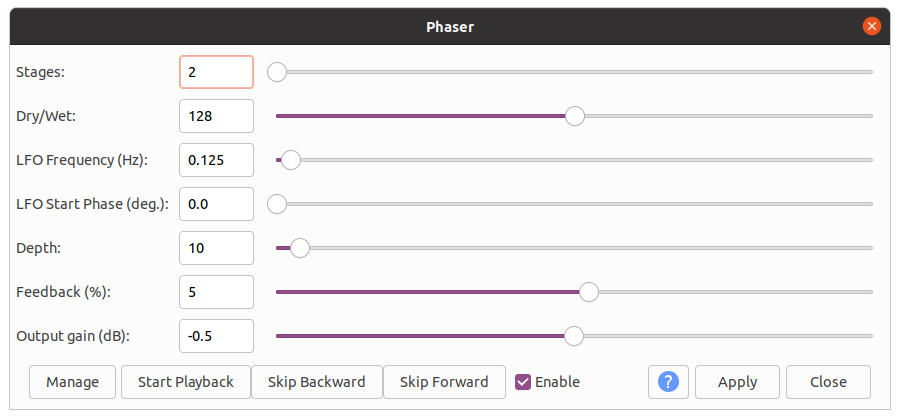
Phaser on "Purchasing Grapes"
Ubuntu can take a picture of a selected window by Alt + Shift + PrtSc to "Pictures" folder.